
Secure your VPS
When you deploy a new VPS, it is not particularly secure and you should take further steps to secure it, before you use it. Here are some suggestions.
The root account is the default administrative user account in Linux. It should always be disabled for security reasons, and an user account with sudo privileges (Super User DO) should be used to perform all administrative tasks. Please note that you should only disable the root account if you already have an existing user account with sudo privileges, otherwise you will lock yourself out of your VPS. You should also consider using a firewall. In this tutorial I'll use iptables.
In this article I'll show you first how you can secure your VPS manually, then in the end how you can do it automatically using one of my scripts.
When you log in to your VPS for the first time, you will need to log in as root with a randomly generated password. Click the eye icon to see the password.

You could use the console from your account at alexhost.com, but the encoding settings for console doesn't always match with your keyboard, so you will probably experience a different keyboard layout which makes it difficult to find the right key for a specific character. Font size is also very large, and there is no possibility to change it. So I use a SSH client (PuTTY). See the SSH key authentication article on how to configure PuTTY.
Start PuTTY and enter the IP address of your VPS in "Host Name (or IP address)" field. Leave port 22 in "Port" field unchanged for now, and click on "Open" button.

Since this is first time you log in to your VPS with PuTTY, you will get a warning that "The host key does not match the one PuTTY has catched for this server". This is normal. Click on "Accept" button and a terminal will open. Log in as root with the root password from your "server details" page at alexhost.com.
Before you start, make sure you have the necessary packages.
sudo apt install -y coreutils
sudo apt install -y findutils
sudo apt install -y iproute2
Add a new account with sudo privileges
Add a new user account.
Change vpnuser with your preferred username.
After entering a password for the new user, you will be asked to enter "Full Name", "Room Number", "Work Phone", "Home Phone" and "Other". You can press Enter for each of the fields, then press y and Enter to confirm, and the new user will be created.
Grant sudo privileges to vpnuser. In order to do that, you have to use visudo.
Find the line
root ALL=(ALL:ALL) ALL
and add
vpnuser ALL=(ALL:ALL) ALL
or if you don't want to enter the password every now and then, add this line instead (not recommended)
vpnuser ALL=(ALL:ALL) NOPASSWD:ALL
after that line.
Press Ctrl x, then y and Enter to save the file.
You should now log out
and log in again with the new user.
switzerland login: vpnuser
Password:
Disable the root user
In order to disable the root user, you can disable access to the root user shell. This wil disable direct login for the root user, and the sudo su command. All sudo users will have to perform administrative tasks on the VPS with their own account. You can disable the root user by editing the /etc/passwd file. Open the /etc/passwd file in a text editor, in this case nano.
Change the line root:x:0:0:root:/root:/bin/bash to root:x:0:0:root:/root:/sbin/nologin.
Press Ctrl x, then y and Enter to save the file.
SSH server
You should now disable root login to SSH and change the port the SSH server is listening to. Port 22 is one of the most scanned ports to find vulnerabilities and the root account is one of the main targets, since it is a common standard account for SSH server. To disable root login to SSH and change the SSH port, open /etc/ssh/sshd_config file in a text editor.
sudo nano /etc/ssh/sshd_config
Find the line PermitRootLogin yes, and change it to PermitRootLogin no.
PermitRootLogin no
As said before don't disable root login unless you have added an user account with sudo privileges.
Then find the line #Port 22, uncomment it and change the port to, for example 12345.
Port 12345
Change "12345" to whatever you like, but make sure not to change it to a TCP port the SoftEther VPN server will listen to, for example 443, 992, 1194 and 5555, if you want to use those ports for SoftEther VPN server.
Press Ctrl x, then y and Enter to save the file.
Finally, you have to restart the SSH server to apply the changes.
sudo systemctl restart sshd
From now on, remember to use the new SSH port (if you have changed it here), when you use PuTTY or other SSH client.
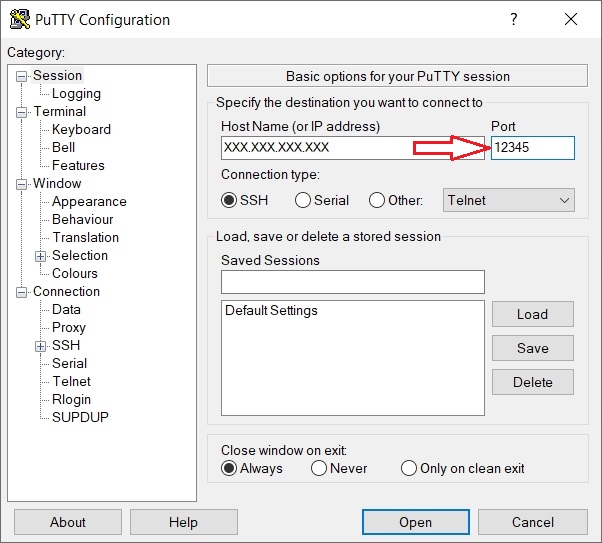
Replace "12345" with the new SSH port of your choice.
Disable IPv6
IPv6 has many advantages compared to IPv4. However, in some rare cases IPv6 has caused network problems. In this tutorial I'll assume the IPv6 will be disabled.
In order to disable IPv6 you have to edit/create two files. First open /etc/default/grub file in a text editor.
sudo nano /etc/default/grub
Find the line containing ipv6.disable=0 if it exists, and change 0 to 1.
GRUB_CMDLINE_LINUX=" ipv6.disable=1 ...
Press Ctrl x, then y and Enter to save the file.
Then update the Grub loader.
sudo update-grub
Next, open a new file /etc/sysctl.d/99-custom.conf.
sudo nano /etc/sysctl.d/99-custom.conf
Add the following lines:
net.ipv6.conf.all.disable_ipv6=1
net.ipv6.conf.default.disable_ipv6=1
net.ipv6.conf.lo.disable_ipv6=1
Press Ctrl x, then y and Enter to save the file.
Reload procps service to apply the changes.
sudo service procps force-reload
iptables firewall
iptables is the default packet filtering framework used by Debian and other Linux distributions. In this tutorial I'll assume that iptables is the default firewall used on the VPS. Since we are going to use iptables directly, we can uninstall ufw if it is installed. Also, ufw conflicts with iptables-persistent which you have to install later. So, in this tutorial I'll assume that ufw will be uninstalled.
In order to uninstall ufw run the following commands:
sudo ufw disable
sudo apt-get --purge -y remove ufw
sudo apt -y autoremove
When uninstalling ufw, iptables will also be uninstalled, so you have to reinstall iptables.
sudo apt install -y iptables
Now you can start adding rules to iptables:.
sudo iptables -F
sudo iptables -X
sudo iptables -P INPUT DROP
sudo iptables -P FORWARD DROP
sudo iptables -P OUTPUT ACCEPT
sudo iptables -A INPUT -i lo -j ACCEPT
sudo iptables -A INPUT -m state --state ESTABLISHED,RELATED -j ACCEPT
sudo iptables -A FORWARD -m state --state ESTABLISHED,RELATED -j ACCEPT
sudo iptables -A OUTPUT -m state --state ESTABLISHED,RELATED -j ACCEPT
This vil flush all rules from iptables, delete all chains, set the default policy for INPUT, FORWARD, and OUTPUT chains, allow traffic on loopback interface, and allow established and related traffic in INPUT, FORWARD and OTUPUT chains.
SoftEther VPN server listens on several different ports by default:
- 443/tcp - HTTPS (HTTP over SSL)
- 992/tcp - TELNETS (TELNET over SSL)
- 1194/tcp - OpenVPN
- 5555/tcp - used by the admin console
In addition you can also open the following UDP ports:
- 1194/udp - OpenVPN
- 500/udp and 4500/udp - transport UDP Ports
So, depending on your needs, you can open the following ports:
sudo iptables -A INPUT -p tcp --dport 443 -j ACCEPT
sudo iptables -A INPUT -p tcp --dport 992 -j ACCEPT
sudo iptables -A INPUT -p tcp --dport 1194 -j ACCEPT
sudo iptables -A INPUT -p tcp --dport 5555 -j ACCEPT
sudo iptables -A INPUT -p udp --dport 500 -j ACCEPT
sudo iptables -A INPUT -p udp --dport 1194 -j ACCEPT
sudo iptables -A INPUT -p udp --dport 4500 -j ACCEPT
However, keep in mind that you can open only port 443 (it can be used for both admin console and VPN clients) if you do not have any special requirements. Some ports are specific to VPNs and/or SoftEther VPN, and port scanning can allow attackers to find out what services you are running on your server.
If you changed the SSH port earlier, you can block the TCP port 22, and open the new SSH port.
sudo iptables -A INPUT -p tcp --dport 22 -j DROP
sudo iptables -A INPUT -p tcp --dport 12345 -j ACCEPT
Replace "12345" with the new SSH port of your choice.
If you didn't change the SSH port, and still want to use TCP port 22 for SSH, open port 22.
sudo iptables -A INPUT -p tcp --dport 22 -j ACCEPT
You can also add rules to log attempts to use port 22 before dropping them, and block the attacker's IP address later with fail2ban, instead. If you changed the SSH port, it's obvious that anybody trying to use port 22 is an attacker.
sudo iptables -N ssh_chk
sudo iptables -A INPUT -p tcp --dport 22 -j ssh_chk
sudo iptables -A ssh_chk -j LOG --log-prefix 'SSH_trap '
sudo iptables -A ssh_chk -j DROP
Now you can add rules to protect the VPS against syn flood attacks.
sudo iptables -N syn_chk
sudo iptables -A INPUT -p tcp --syn -j syn_chk
sudo iptables -A syn_chk -m limit --limit 2/s --limit-burst 4 -j RETURN
sudo iptables -A syn_chk -j LOG --log-prefix 'Over_SYN_limit '
sudo iptables -A syn_chk -j DROP
Now you can add rules to limit icmp traffic, accept the good icmp requests, and drop the bad icmp requests
sudo iptables -N icmp_chk
sudo iptables -A INPUT -p icmp -m icmp --icmp-type ping -j icmp_chk
sudo iptables -A icmp_chk -m limit --limit 1/s --limit-burst 3 -j RETURN
sudo iptables -A icmp_chk -j LOG --log-prefix 'Over_PING_limit '
sudo iptables -A icmp_chk -j DROP
sudo iptables -A INPUT -p icmp -m icmp --icmp-type ping -j ACCEPT
sudo iptables -A INPUT -p icmp -m icmp --icmp-type timestamp-request -j DROP
sudo iptables -A INPUT -p icmp -m icmp --icmp-type address-mask-request -j DROP
Then we drop, invalid packets, fragmented packets, all requests for a new connection unless they are SYN, X-MAS packets, NULL packets and other bogus packets.These malformated packets can be a sign of misconfigured network equipment or part of a DOS, or DDOS attack.
sudo iptables -A INPUT -m state --state INVALID -j DROP
sudo iptables -A FORWARD -m state --state INVALID -j DROP
sudo iptables -A OUTPUT -m state --state INVALID -j DROP
sudo iptables -t mangle -A PREROUTING -f -j DROP
sudo iptables -t mangle -A PREROUTING -p tcp ! --syn -m state --state NEW -j DROP
sudo iptables -t mangle -A PREROUTING -p tcp --tcp-flags ALL ALL -j DROP
sudo iptables -t mangle -A PREROUTING -p tcp --tcp-flags ALL NONE -j DROP
sudo iptables -t mangle -A PREROUTING -p tcp --tcp-flags SYN,FIN SYN,FIN -j DROP
sudo iptables -t mangle -A PREROUTING -p tcp --tcp-flags SYN,RST SYN,RST -j DROP
sudo iptables -t mangle -A PREROUTING -p tcp --tcp-flags SYN,FIN,PSH SYN,FIN,PSH -j DROP
sudo iptables -t mangle -A PREROUTING -p tcp --tcp-flags SYN,FIN,RST SYN,FIN,RST -j DROP
sudo iptables -t mangle -A PREROUTING -p tcp --tcp-flags SYN,FIN,RST,PSH SYN,FIN,RST,PSH -j DROP
sudo iptables -t mangle -A PREROUTING -p tcp --tcp-flags FIN FIN -j DROP
sudo iptables -t mangle -A PREROUTING -p tcp --tcp-flags ALL FIN,URG,PSH -j DROP
sudo iptables -t mangle -A PREROUTING -p tcp --tcp-flags ALL SYN,RST,ACK,FIN,URG -j DROP
The mangle table is usually used to inspect the header of packets, so here we can check for fragmented and bogus packets. Since these rules are added to the PREROUTING chain in mangle table, they will affect all packets as soon as they arrive at your firewall, effectively reducing the load on your server.
Now we can block spoofed IP addresses and other bad IP addresses attacks. In this kind of attack, the hackers send packets where source IP address is your own server IP address or IP addresses where the packets can't possibly originate from (bogons). In order to block these spoofed IP addresses, you have to find out the name of your network interface first.
sudo ip -4 addr
The output will look something like this:
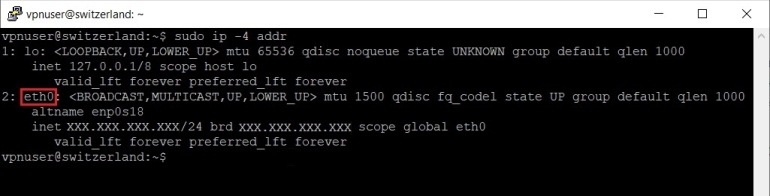
On a newly installed Debian 12, there should be two network interfaces, one for loopback (lo) and one to access the internet (in my VPS this is "eth0"). Now you can add a new rule to block a spoofed IP address pretending to come from your server.
sudo iptables -A INPUT -i eth0 -s XXX.XXX.XXX.XXX -j DROP
Replace "eth0" with your own network interface (it can be different), and "XXX.XXX.XXX.XXX" with the IPv4 address of your VPS.
Now you can add rules to block other spoofed IP addresses and bogons packets.
sudo iptables -A INPUT -i eth0 -s 0.0.0.0/8 -j DROP
sudo iptables -A INPUT -i eth0 -s 10.0.0.0/8 -j DROP
sudo iptables -A INPUT -i eth0 -s 100.64.0.0/10 -j DROP
sudo iptables -A INPUT -i eth0 -s 127.0.0.0/8 -j DROP
sudo iptables -A INPUT -i eth0 -s 127.0.53.53 -j DROP
sudo iptables -A INPUT -i eth0 -s 169.254.0.0/16 -j DROP
sudo iptables -A INPUT -i eth0 -s 172.16.0.0/12 -j DROP
sudo iptables -A INPUT -i eth0 -s 192.0.0.0/24 -j DROP
sudo iptables -A INPUT -i eth0 -s 192.0.2.0/24 -j DROP
sudo iptables -A INPUT -i eth0 -s 192.168.0.0/16 -j DROP
sudo iptables -A INPUT -i eth0 -s 198.18.0.0/15 -j DROP
sudo iptables -A INPUT -i eth0 -s 198.51.100.0/24 -j DROP
sudo iptables -A INPUT -i eth0 -s 203.0.113.0/24 -j DROP
sudo iptables -A INPUT -i eth0 -s 224.0.0.0/4 -j DROP
sudo iptables -A INPUT -i eth0 -s 240.0.0.0/4 -j DROP
sudo iptables -A INPUT -i eth0 -s 255.255.255.255/32 -j DROP
Again replace "eth0" with your own network interface.
After adding these rules to iptables you must enable some system variables so that the rules will work as intended. Open the file /etc/sysctl.d/99-custom.conf in a text editor.
sudo nano /etc/sysctl.d/99-custom.conf
Add net.ipv4.conf.all.log_martians=1 and net.ipv4.conf.default.log_martians=1
net.ipv4.conf.all.log_martians=1
net.ipv4.conf.default.log_martians=1
if you want to log martian packets.
And net.ipv4.conf.default.rp_filter=1 and net.ipv4.conf.all.rp_filter=1
net.ipv4.conf.default.rp_filter=1
net.ipv4.conf.all.rp_filter=1
to enable source address verification.
Press Ctrl x, then y and Enter to save the file.
Reload procps service to apply the changes.
sudo service procps force-reload
Then reload kernel variables to enable the new variables.
sudo sysctl --system
Usually, iptables rules will not persist between reboots. One method to make iptables rules persistent is to use iptables-persistent.
sudo apt install -y netfilter-persistent
sudo apt install -y iptables-persistent
During installation of iptables-persistent you will be asked whether you want to save iptables rules for IPv4 and IPv6. Accept for IPv4, but it is not necessary for IPv6 if you have disabled IPv6 on your VPS.
Remember to always save your iptables rules every time you add new rules.
sudo iptables-save -c | sudo tee /etc/iptables/rules.v4
You should now reboot your VPS to apply all the new changes.
sudo reboot
As I said in the begining, you can also use one of my scripts to secure your VPS automatically. Please note that the script has only been tested in Debian 12 and 13 (it will not run in other Debian versions) and is meant for a VPS with a freshly installed Debian 12 or 13. The script also assumes that you use iptables as your firewall (ufw will be uninstalled) and IPv6 will be disabled.
To secure your VPS automatically download the script first.
sudo wget -nv https://private-vpn-setup.com/downloads/secure-your-vps
Then run the file secure-your-vps.
sudo bash secure-your-vps
You will have to enter, for example, the name of a new account with sudo privileges, and confirm some choices, but everything should be done within a few minutes. However, you should check manually afterwards to see if everything went Ok. The image of the OS may change, and the script may not catch the changes. This applies to all scripts on this site.