

Local bridge setup
After installing SoftEther VPN Server and adding users, you have to configure the network. In this article, I will show you how to configure a local bridge. Configuring a local bridge for SoftEther VPN server is a little bit more difficult, especially because of the many dependencies that must be addressed, but it is definitely worth it. The speed of your network will be much higher than with, for example, SecureNAT (which is easier to setup). As usual, I will show you first how to do it manually, and in the end how to do it automatically using one of my scripts.
Start the Command Line Management utility vpncmd.
cd /usr/local/softether/
sudo ./vpnserver start
sudo ./vpncmd
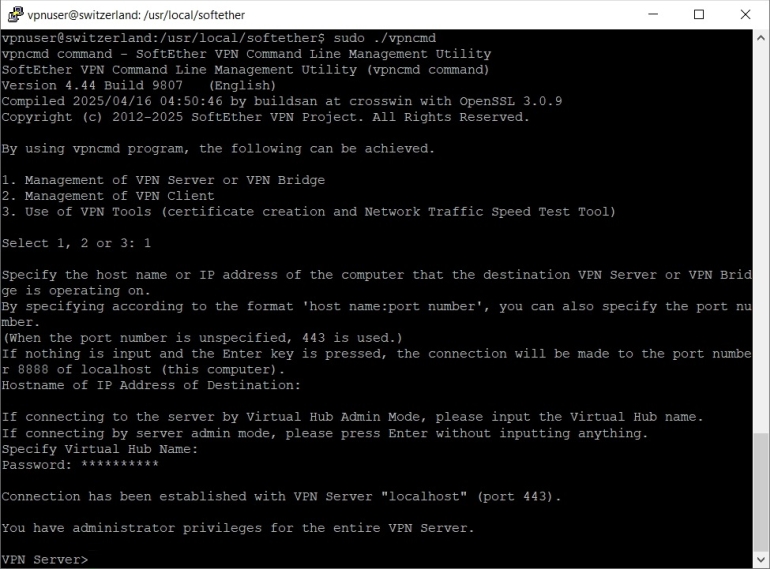
Press 1, then Enter and again Enter twice to enter the server admin mode, then enter your SoftEther VPN server password to login.
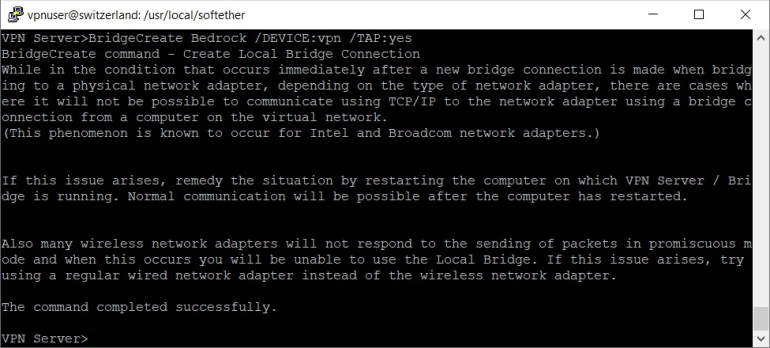
When you see the vpnserver prompt VPN Server> you can create a new local bridge connection.
BridgeCreate Bedrock /DEVICE:vpn /TAP:yes
This command will create a new local bridge connection between virtual hub "Bedrock" and a new TAP device "tap_vpn".
To check if the new TAP device was created, exit the Command Line Management utility vpncmd and list the network interfaces.
sudo ip link show
You should see the new TAP device "tap_vpn" in the list of network interfaces.

Next you have to install a DHCP server on your VPS. I am going to use dnsmasq in this tutorial. However, dnsmasq conflicts with systemd-resolved service, so you will have to stop and disable systemd-resolved service before installing dnsmasq.
sudo systemctl disable --now systemd-resolved
sudo systemctl stop systemd-resolved
sudo systemctl daemon-reload
sudo apt install -y dnsmasq
After installing dnsmasq edit /etc/dnsmasq.conf file.
sudo nano /etc/dnsmasq.conf
And add these lines at the end of the file:
# dnsmasq runs on localhost port 53 and network interface tap_vpn.
port=53
listen-address=127.0.0.1
interface=tap_vpn
# Disable forwarding names without the main domain,
# disable forwarding addresses in the non-routed address spaces,
# automatically append the domain part to simple names and
# disable dnsmasq to read /etc/resolv.conf file.
domain-needed
bogus-priv
expand-hosts
no-resolv
# External DNS Servers.
# Using Quad9 and Cloudflare for more privacy.
server=9.9.9.9
server=149.112.112.112
server=1.1.1.1
server=1.0.0.1
# Enable DNS Cache and adjust cache-size (can go up to 10000).
cache-size=3000
# Define IP address range, netmask, lease time, default router and
# lease db file for DHCP server and make the DHCP server authoritative.
dhcp-range=tap_vpn,192.168.100.10,192.168.100.90,255.255.255.0,12h
dhcp-option=tap_vpn,3,192.168.100.1
dhcp-leasefile=/var/lib/misc/dnsmasq.leases
dhcp-authoritative
Press Ctrl x, then y and Enter to save the file.
You can also rename the /etc/dnsmasq.conf file to, for example /etc/dnsmasq.conf.bak and create a new /etc/dnsmasq.conf file. I find this easier since the original /etc/dnsmasq.conf file contains a lot of explanations for all the available options. But it's worth keeping as a reference.
sudo mv /etc/dnsmasq.conf /etc/dnsmasq.conf.bak
sudo nano /etc/dnsmasq.conf
Restart dnsmasq to apply the new changes.
sudo systemctl restart dnsmasq
Then to make SoftEther VPN server automatically start at boot time you have to create a systemd service unit for it. You can also configure the service to run ip command and assign 192.168.100.1/24 to the new TAP interface, as well. Open a new file /etc/systemd/system/vpnserver.service in a text editor.
sudo nano /etc/systemd/system/vpnserver.service
Add the following lines inside it:
[Unit]
Description=SoftEther VPN Server
After=network-online.target
Before=dnsmasq.service
StartLimitIntervalSec=0
[Service]
Type=forking
ExecStart=/usr/local/softether/vpnserver start
ExecStop=/usr/local/softether/vpnserver stop
ExecStartPost=/bin/sleep 03
ExecStartPost=/sbin/ip a add 192.168.100.1/24 dev tap_vpn
Restart=always
RestartSec=1
[Install]
WantedBy=multi-user.target dnsmasq.service
Press Ctrl x, then y and Enter to save the file.
Enable vpnserver service.
sudo systemctl enable vpnserver.service
Add iptables rules to allow new connections from the local subnet.
sudo iptables -A INPUT -s 192.168.100.0/24 -m state --state NEW -j ACCEPT
sudo iptables -A FORWARD -s 192.168.100.0/24 -m state --state NEW -j ACCEPT
sudo iptables -A OUTPUT -s 192.168.100.0/24 -m state --state NEW -j ACCEPT
Add iptables rules to allow outgoing DNS.
sudo iptables -A OUTPUT -o tap_vpn -s 192.168.100.1/24 -p tcp --dport 53 -m state --state NEW,ESTABLISHED -j ACCEPT
sudo iptables -A OUTPUT -o tap_vpn -s 192.168.100.1/24 -p udp --dport 53 -m state --state NEW,ESTABLISHED -j ACCEPT
Add iptables rules to allow incoming DNS and DHCP (dnsmasq).
sudo iptables -A INPUT -i tap_vpn -p udp --dport 67 -m state --state NEW,ESTABLISHED -j ACCEPT
sudo iptables -A INPUT -i tap_vpn -p tcp --sport 53 -m state --state ESTABLISHED -j ACCEPT
sudo iptables -A INPUT -i tap_vpn -p udp --sport 53 -m state --state ESTABLISHED -j ACCEPT
Next you have to enable NAT on your VPS. Open the file /etc/sysctl.d/99-custom.conf in a text editor.
sudo nano /etc/sysctl.d/99-custom.conf
And add the net.ipv4.ip_forward=1 variable.
net.ipv4.ip_forward=1
Press Ctrl x, then y and Enter to save the file.
Reload procps service to apply the changes.
sudo service procps force-reload
Reload system variables to enable net.ipv4.ip_forward variable.
sudo sysctl --system
Finally add an iptables rule to allow NAT.
sudo iptables -t nat -A POSTROUTING -s 192.168.100.0/24 -j SNAT --to-source XXX.XXX.XXX.XXX
Replace "XXX.XXX.XXX.XXX" with the IPv4 address of your VPS.
And save the iptables rules.
sudo iptables-save -c | sudo tee /etc/iptables/rules.v4
You should now reboot your VPS to apply the new changes.
sudo reboot
As I said in the begining you can use one of my scripts to setup the local bridge automatically. Download the script first.
sudo wget -nv https://private-vpn-setup.com/downloads/local-bridge-setup
Then run the file local-bridge-setup.
sudo bash local-bridge-setup